")

Table of Contents
ToggleA furnace that quits on the coldest night of winter. An air conditioner that blows warm air mid-July. These aren’t just inconveniences, they’re expensive emergencies that usually happen because routine maintenance got pushed aside. Most HVAC systems are designed to run 15–20 years, but they only hit that mark with consistent care. This guide walks homeowners through the maintenance tasks they can handle themselves, troubleshooting common problems, and knowing exactly when to call in a licensed technician.
Key Takeaways
- Regular HVAC maintenance prevents costly emergency repairs costing $2,000+ and extends system lifespan to the full 15–20 years it’s designed for.
- Homeowners can handle 70% of routine HVAC maintenance themselves, including filter changes, coil cleaning, and drain line testing, without professional certification.
- Clogged filters and dirty coils reduce efficiency by 15% or more, directly increasing energy costs; filter replacement every 1–3 months is the single most critical maintenance task.
- Most common HVAC problems like weak airflow, warm air from AC, and strange noises can be diagnosed and fixed at home, but refrigerant leaks, electrical failures, and heat exchanger damage require a licensed technician.
- Annual professional maintenance at $80–150 per visit, combined with DIY seasonal checks and thermostat upgrades, significantly reduces breakdowns and saves homeowners thousands in premature replacement costs.
Why Regular HVAC Maintenance Matters for Homeowners
HVAC systems represent one of the biggest investments in a home, and they’re responsible for roughly 40–50% of total energy costs. When filters clog, coils accumulate dirt, or refrigerant levels drop, efficiency tanks, sometimes by 15% or more. That lost efficiency shows up directly on utility bills.
Beyond cost, neglected systems fail sooner. Blower motors burn out from overwork. Compressors seize when they run low on refrigerant. Drain lines back up and cause water damage. A $200 annual maintenance routine prevents $2,000+ emergency repairs and extends the system’s lifespan by years.
There’s also indoor air quality. Dirty filters and ducts circulate dust, mold spores, and allergens. For households with asthma or allergies, that’s not just uncomfortable, it’s a health issue. Regular maintenance keeps air moving cleanly and efficiently through the home.
DIY HVAC Maintenance Tasks You Can Handle Yourself
Most homeowners can handle 70% of routine HVAC maintenance with basic tools and an hour or two per season. These tasks don’t require refrigerant handling or electrical troubleshooting, so they’re safe for DIYers.
Filter Changes and Air Quality Improvements
Filters are the most critical, and most neglected, part of HVAC maintenance. Standard 1-inch fiberglass filters should be checked monthly and replaced every 1–3 months, depending on household conditions. Homes with pets, smokers, or high dust levels need monthly changes. Thicker pleated filters (4–5 inches) can last 6–12 months but still need monthly visual checks.
Filter specs matter. MERV ratings (Minimum Efficiency Reporting Value) range from 1 to 16. MERV 8–11 filters balance particle capture with airflow for most residential systems. Higher ratings (MERV 13+) capture more particles but restrict airflow, which can strain older blowers not designed for the added resistance. Check the system manual before upgrading.
To change a filter:
- Turn off the system at the thermostat.
- Locate the filter slot (usually in the return air duct or air handler cabinet).
- Note the airflow direction arrow on the old filter frame.
- Slide out the old filter and dispose of it.
- Insert the new filter with the arrow pointing toward the blower.
- Turn the system back on.
While the filter is out, inspect the return grille. Dust and pet hair accumulate here. Vacuum it with a brush attachment.
Return and supply registers throughout the house need vacuuming every few months. Pull the grilles off (most snap or screw in place) and wipe them down. Vacuum a foot or two into the duct opening if accessible. Blocked vents force the system to work harder and create uneven temperatures between rooms.
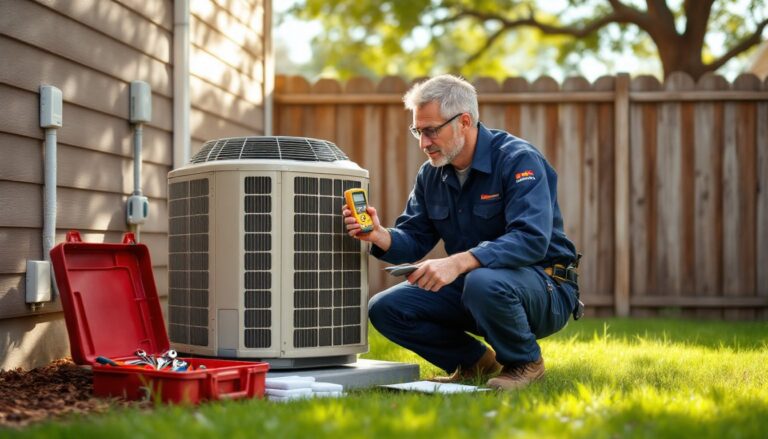
Seasonal Maintenance Checklist
Spring (before cooling season):
- Replace or clean the air filter.
- Inspect the outdoor condenser unit. Clear leaves, grass clippings, and debris within 2 feet of the unit.
- Straighten any bent condenser fins using a fin comb (available at hardware stores for $10–15). Bent fins restrict airflow.
- Hose down the condenser coils from the inside out using low pressure. High pressure can damage the fins.
- Check that the unit sits level. Settling soil can tilt it, which strains the compressor.
- Test the condensate drain line by pouring a cup of water mixed with a tablespoon of bleach down the drain pan. If it drains freely, the line is clear.
- Set the thermostat to cooling mode and verify cold air flows from all registers.
Fall (before heating season):
- Replace or clean the air filter.
- Inspect the furnace area. Ensure combustibles (paint cans, cardboard, cleaning supplies) are stored at least 3 feet away. This is required by most fire codes.
- Check the furnace flame (for gas units). It should burn steady blue with a small yellow tip. A large yellow or orange flame indicates incomplete combustion, call a technician.
- Test the furnace by setting the thermostat to heating mode. Listen for unusual noises (grinding, squealing, banging).
- Vacuum the blower compartment if accessible. Dust buildup on the blower wheel reduces airflow.
- Inspect the flue pipe (metal exhaust vent). Look for rust, gaps, or soot buildup. Damaged flue pipes can leak carbon monoxide, this requires immediate professional attention.
- Replace the carbon monoxide detector battery and test it.
Year-round:
- Keep the area around indoor air handlers and furnaces clear.
- Check thermostat batteries twice a year (spring and fall time changes are easy reminders).
- Listen for odd sounds when the system runs. Rattles, hums, and clicks can indicate loose parts or failing components.
Common HVAC Problems and How to Troubleshoot Them
System won’t turn on:
- Check the thermostat. Verify it’s set to Heat or Cool (not Off) and the temperature setting makes sense.
- Replace thermostat batteries if it’s battery-powered.
- Inspect the circuit breaker. HVAC systems often have two breakers, one for the air handler/furnace and one for the outdoor condenser. Reset any tripped breakers.
- Look for a safety switch near the air handler or furnace. These shut off power when the access panel is removed. Make sure it’s engaged.
Weak airflow from vents:
- Replace a clogged filter. This is the most common cause.
- Check that all supply registers are open and unblocked by furniture or curtains.
- Inspect the blower motor. If it’s running but airflow is weak, the blower wheel may be coated in dust. This requires opening the blower compartment and cleaning it.
Air conditioner blows warm air:
- Confirm the thermostat is set to Cool, not just Fan.
- Check the outdoor condenser unit. If it’s not running, the issue could be a tripped breaker, a blown fuse, or a failed capacitor. Capacitor replacement is a common DIY fix with a $15–30 part, but discharge the old capacitor with an insulated screwdriver before touching it, they store a dangerous charge even when power is off. If you’re not comfortable with electrical work, call a pro.
- Frozen evaporator coils indicate restricted airflow (dirty filter, closed vents) or low refrigerant. Turn off the system and let the coils thaw (this can take several hours). If the problem repeats, it’s likely a refrigerant leak requiring a licensed technician.
Strange noises:
- Squealing or screeching: Blower motor bearings need lubrication or the belt is worn (older systems). Some motors have oil ports: add a few drops of electric motor oil if specified in the manual.
- Banging or clanking: Loose or broken blower wheel, or a failing mount. Turn off the system and inspect the blower.
- Clicking: Normal at startup/shutdown. Continuous clicking suggests a failing relay or capacitor.
- Hissing: Possible refrigerant leak. This requires a technician certified under EPA Section 608 to handle refrigerant.
Water pooling around the indoor unit:
- The condensate drain line is clogged. Locate the drainpipe (usually ¾-inch PVC running from the air handler to a floor drain or outdoors). Disconnect it at the air handler and use a wet/dry vacuum to suck out the clog from the drain end. Flush the line with the bleach-water solution mentioned earlier.
- If the drain pan itself is cracked or rusted through, it needs replacement. Pans cost $20–50, but accessing them can be tricky depending on the unit’s configuration.
When to Call a Professional for HVAC Repair
Some repairs are beyond DIY scope, either because they require specialized tools, licensing, or they involve safety-critical components.
Call a licensed HVAC technician when:
- Refrigerant is involved. Federal law requires EPA certification to handle refrigerants. Low refrigerant means a leak, which must be found, repaired, and recharged by a pro.
- Electrical components fail. Replacing a capacitor is borderline DIY, but anything involving the control board, compressor wiring, or high-voltage connections should be handled by someone with electrical training.
- The heat exchanger is cracked. This is a furnace component that separates combustion gases from breathable air. Cracks allow carbon monoxide into the home, a life-threatening issue. Replacement often costs $1,000–2,000, and many homeowners opt to replace the entire furnace at that point.
- The compressor fails. Compressor replacement runs $1,500–2,500 installed. On systems over 10 years old, replacing the entire outdoor unit makes more financial sense.
- Gas line work is needed. Any work involving gas supply lines, pressure regulators, or burners requires a licensed gas technician and often a permit.
- The system needs a refrigerant conversion. Older systems using R-22 refrigerant (phased out as of 2020) may need conversion to R-410A or replacement. This isn’t a DIY job.
- Ductwork is damaged or improperly sized. Leaky or undersized ducts waste 20–30% of conditioned air. Sealing and resizing requires duct blasters, mastic sealant, and often access to crawl spaces or attics with asbestos insulation concerns.
Platforms like Angi and HomeAdvisor can connect homeowners with licensed HVAC contractors and provide cost estimates for common repairs.
Permits and codes:
Replacing an HVAC system almost always requires a permit. Work must comply with the International Residential Code (IRC) and National Electrical Code (NEC), and inspectors verify proper refrigerant handling, gas line connections, venting, and condensate drainage. DIYers can legally perform maintenance, but full system replacement or major component swaps typically require a licensed contractor to pull permits and pass inspection.
Extending Your HVAC System’s Lifespan Through Proper Care
A well-maintained HVAC system easily reaches its expected lifespan, 15–20 years for furnaces and heat pumps, 10–15 years for air conditioners. Systems that fail early almost always suffered from neglect: clogged filters, dirty coils, skipped tune-ups.
Key practices for longevity:
- Schedule professional maintenance annually. A technician will check refrigerant levels, test electrical connections, measure airflow, inspect the heat exchanger, and catch problems before they cause breakdowns. Cost typically runs $80–150 per visit. Many contractors offer service agreements that include two visits per year (spring and fall) at a discount.
- Don’t ignore minor issues. A small refrigerant leak becomes a failed compressor. A noisy blower bearing becomes a seized motor. Early intervention is almost always cheaper.
- Upgrade the thermostat. Programmable or smart thermostats reduce runtime by adjusting temperatures when the house is empty. Less runtime means less wear. A quality programmable thermostat costs $50–100: smart models with remote control and learning features run $120–250.
- Seal and insulate ductwork. Leaky ducts in attics or crawl spaces force the system to overwork. Use mastic sealant (not cloth duct tape, which fails over time) on joints and seams. Wrap ducts in unconditioned spaces with R-6 to R-8 duct insulation.
- Keep outdoor units shaded and clean. Condenser units in direct sun run hotter and work harder. Planting shrubs 2–3 feet away (not closer, airflow matters) or installing a louvered shade screen can improve efficiency by up to 10%.
- Replace aging systems before they fail. If a furnace or AC is nearing the end of its expected lifespan and requires a major repair (compressor, heat exchanger), replacement is usually smarter. Newer systems are 20–40% more efficient thanks to variable-speed blowers, two-stage compressors, and improved refrigerants.
For a detailed breakdown of seasonal HVAC tasks, homeowners can follow structured checklists that align with manufacturer recommendations and regional climate demands.
Safety reminders:
- Always wear safety glasses when working around HVAC equipment, especially when handling capacitors or cleaning coils.
- Use work gloves to protect against sharp sheet metal edges inside air handlers.
- Turn off power at the breaker, not just the thermostat, before opening any electrical panels.
- Never bypass a safety switch or disable a limit control. They’re there to prevent fires and equipment damage.
Routine care isn’t glamorous, but it’s the difference between an HVAC system that quietly does its job for two decades and one that becomes a recurring budget headache.